Setting up Beocat to run a parameter sweep
- First, you need to copy the project with all of its files into Beocat.
- This can be done several ways, but make sure that you have them in the same folder, which needs to be named proj.
- If you want to name it differently, you need to update run.sh to have the path to the new folder on line 15, where it has the command
python ~/proj/Main_P.py - The project folders should be structured correctly if you kept them as given, but make sure that the project is structured as follows: proj folder containing: all python and .sh files, a references folder containing ASTMA1096.txt, wireproperties.txt, and a geo_points folder containing all geometric point files
- Navigate into your proj folder using the command
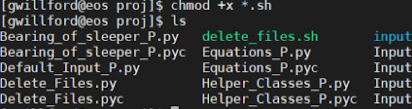
cd proj. Additionally, if you are unfamiliar with using Linux, I would recommend reading this page on Linux basics: https://support.beocat.ksu.edu/BeocatDocs/index.php?title=LinuxBasics - Make all .sh files in your proj folder executable, using the command chmod +x *.sh in your proj folder. This should make .sh files appear in green now, as shown below (note that not all files are shown)
- Set up Beocat to run the Python files.
- You can run the set_up_beocat.sh file to do this automatically. Run it by going to the folder that the file is in and entering the command
./set_up_beocat.sh - If set_up_beocat.sh doesn’t work, what you need to do is create a ‘virtual environment’ for running python. You can look at [help page] to see a different guide for doing so, but you can also look at the commands in set_up_beocat.sh to see an example of setting up the virtual environment.

Running a parameter sweep on Beocat
There are two ways to schedule the parameter sweep: directly or through the manager application.
Option 1: run directly
- Log into Beocat and navigate to your proj folder
- Run the following command to run the parameter sweep script by itself:
./sched_run.sh - If you’d like to run a whole parameter sweep: enter
yeswhen prompted - Otherwise, enter
noand then the number of jobs you do want to run. Please note that this will just run the first jobs up to that number (ie if you enter 100 it will run the first 100 jobs). - Wait for the program to finish, it will create all the input files and schedule as many jobs at once as it can. Please note if you interrupt the program, you will need to rerun it in order to schedule the jobs, as it only schedules them at the end of the program.
- The first batch should be scheduled now that the program is done.
- Note: Do not delete the file remaining_jobs.csv unless you want to stop your current parameter sweep! It is used for keeping track of which chunks we have already submitted.
- Follow the Run the next batch of jobs section below
Option 2: run through the manager application
- Log into Beocat and navigate to your proj folder
- Run the following command to run the manager program by itself:
./manager.sh - Enter s when prompted by the program
- If you’d like to run a whole parameter sweep: enter yes when prompted
- Otherwise, enter
noand then the number of jobs you do want to run. (ie if you enter 100 it will run the first 100 jobs). - Wait for the program to finish, it will create all the input files and schedule as many jobs at once as it can. Please note if you interrupt the program, you will need to rerun it in order to schedule the jobs, as it only schedules them at the end of the program.
- The first batch should be scheduled now that the program is done.
- Complete any other operations you want to do and then exit the program.
- Note: Do not delete the file remaining_jobs.csv unless you want to stop your current parameter sweep! It is used for keeping track of which chunks we have already submitted.
- Follow the Run the next batch of jobs section below
Run the next batch of jobs/Resubmit failed jobs
Due to the limit on the number of jobs that can be submitted to Beocat, you will need to schedule the jobs in batches. There are two ways to handle doing this, as shown below. Please be sure that you wait for the majority of each batch to finish before scheduling the next batch
Option 1: run directly
- Log into Beocat and navigate to your proj folder
- Run the following command to run the script to submit the next jobs directly:
./manage_jobs.sh - Repeat this process every couple of days until you see the message
No jobs remaining to be run!
Option 2: run through the manager application
- Log into Beocat and navigate to your proj folder
- Run the following command to run the manager program:
./manage_jobs.sh - Enter
mwhen prompted by the program - Repeat this process every couple of days until you see the message
No jobs remaining to be run!
Running a single job with a specific file number
By default, if you just run the simulation by itself, it will use the input file with number 1. If you’d like to run a specific file number, please follow the instructions below.
If you just want to run the sim in your terminal
- Log into Beocat and navigate to your proj folder
- Run the following command to run the sim in your terminal:
./run.sh <file number you’d like to run>. For example, to run file number 3,521 you’d do:./run.sh 3521 - Wait for it to finish, the results will be written in the output folder with the number you used.
If you'd like to schedule it on Beocat
- Log into Beocat and navigate to your proj folder
- Enter the following command to schedule the job:
sbatch ./run.sh <file number you’d like to run>. For example, to run file number 3,521 you’d do:sbatch ./run.sh 3521 - Beocat will run the job once it has an opening and will write the results to the output folder
Changing the range of a parameter in the sweep
If you need to change the range of a parameter in the sweep, the process should be simple. Please do also note that increasing the range of a parameter dramatically increases the number of combinations of inputs that are created, so you should think about reducing the ranges of other parameters when adding your own to avoid needing to do a ridiculous number of different combinations (at the time of writing this, there are already over 300,000 combinations, which is a very large number of simulations to run, even for Beocat.
- Go to the
Define parameter sweep rangessection ofParameter_Sweep_P.py, some of which is shown below.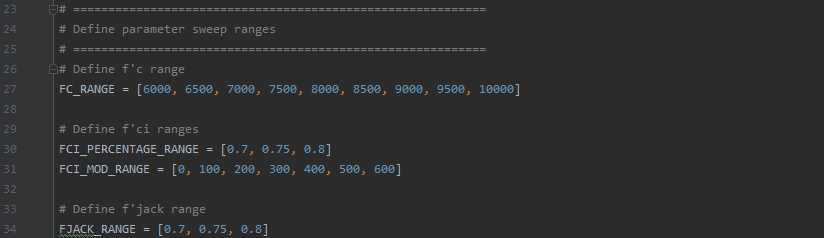
- Edit the range of the parameter you want in the file and save it. For example, if I want FC to range from 5500 to 7500 instead of 6000 to 10000, I would change it to be
FC_RANGE = [5500, 6000, 65000, 7000, 7500] - Copy the file to Beocat (if you edited it locally). Please note that if you changed the file name, you will need to update the
import Parameter_Sweep_Pstatement in Manager_P.py - Run the parameter sweep, the updated range will be used to generate files.

Adding new parameters to the parameter sweep
Adding parameters to the sweep is a fairly involved process, but it should be simple if you make sure to complete the steps below. Please do also note that adding any parameters dramatically increases the number of combinations of inputs that are created, so you should think about reducing the ranges of other parameters when adding your own to avoid needing to do a ridiculous number of different combinations (at the time of writing this, there are already over 300,000 combinations, which is a very large number of simulations to run, even for Beocat.
Step 1: Add the parameter as a member of the InputData class in Input_Data_P.py
Before you do this, if you don’t know what Python classes are, I’d strongly recommend reading the Python documentation for classes (can be found at https://docs.python.org/2/tutorial/classes.html).
If the parameter is not already being passed in to the __init__ function, part of which is shown below, do the following steps:

- Add the parameter as an input parameter for the
__init__function, by adding it in a line like the others to the big list of parameters shown partially above. For example, I'd add something likefr_mod=7000 - Next, add the parameter as a class member in the function by adding a statement such as
self.param_name = param_namein the function (like the other members already there, one is shown below)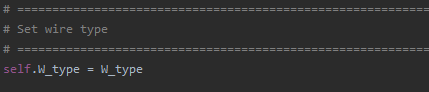
- NOTE: If there is already a line with
self.param_name = ...at the bottom of the function (under the headerSet all remaining inputs to defaults/input parameters), you should remove that now, as you are adding a new one instead. - For example,
self.fr_mod = fr_mod. Note, it is crucial to remember theselfprefix on that! If you forget it, the parameter won’t be written to the input file. - The program should automatically be able to include the new parameter in the input file now.

If the parameter is already being passed into the function, do the following steps if necessary
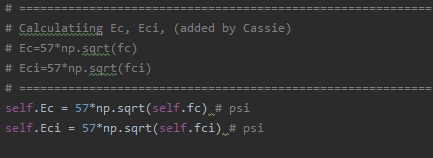
- If you need to change a parameter to use a new formula, for example, find the line that is self.param = param and update it to use the new equation. For example, Ec and Eci use an equation like below:

Step 2: Add the range of the parameter to Parameter_Sweep_P.py
- Go to the
Define parameter sweep rangessection ofParameter_Sweep_P.py, the beginning of which is shown below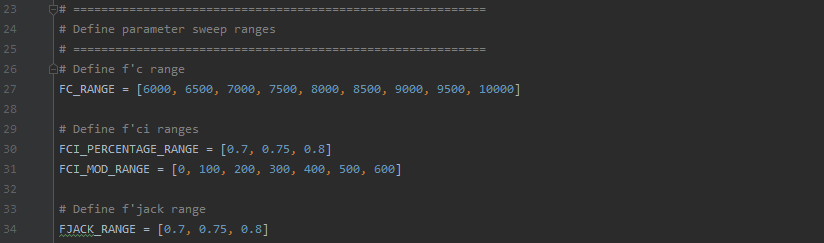
- Add the range of the parameter you want in the file in the same style as the previous ranges, calling it
<parameter_name>_RANGE. For example, if I want to add the parameter Bearing to range from 5 to 10 with intervals of 1, I would add the following line:BEARING_RANGE = [5, 6, 7, 8, 9, 10] - Update the function
generate_filesto use this new range as well by adding a for loop for it. For example, I’d update what is already there (shown below) to include a new for loop for my new range too on the innermost level, such asfor bearing in BEARING_RANGE: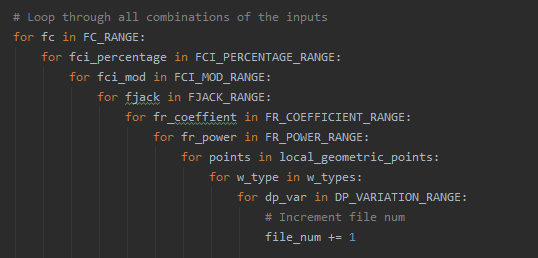
- Pass the new variable into the
input_data.InputDatacall shown below. For example, I’d add the following to the parameters that are already there:bearing=bearing,if bearing was a new parameter I added above.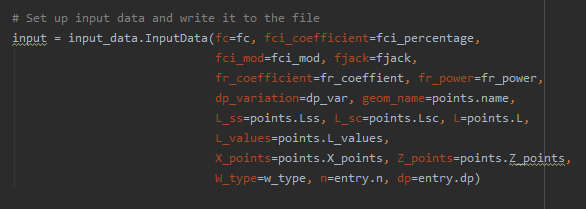
- Add to the num_jobs calculation to include the new range (shown below). You should multiply what is already there by the len of your new range (by doing something like
len(BEARING_RANGE)).


Step 3: Update Input_P.py to read this new parameter and the code to use it
- Add to the other calls to read this new parameter from the input.
- Add a line to
write_paramslike the others to write this new parameter to the results file as well.
Using the output sorting program
This program allows you to search for results that match your entered parameter values and save them to a new .csv file that you specify.
Option 1: run directly
- Log into Beocat and navigate to your proj folder
- Run the following command to run the script to search for results directly:
./sort_output.sh - When prompted, enter the parameters you are searching as
name1=value1 name2=value2 name3=value3 etc, separated by spaces. There is not a limit on the number of parameters you use to search. Please do note, however, that the only parameters you will be able to search are those that are written in the first line of the results file. - For example, to search for WA wire type, fps of 213, and fc of 6000 I’d enter the following:
W_type=WA fps=213 fc=6000 - Enter the name of the file you’d like results saved to when prompted.
- Repeat if you’d like to do other searches, otherwise end the program.
Option 2: run through the manager application
- Log into Beocat and navigate to your proj folder
- Run the following command to run the manager program:
./manage_jobs.sh - Enter
owhen prompted by the program - When prompted, enter the parameters you are searching as
name1=value1 name2=value2 name3=value3 etc, separated by spaces. There is not a limit on the number of parameters you use to search. Please do note, however, that the only parameters you will be able to search are those that are written in the first line of the results file. - For example, to search for WA wire type, fps of 213, and fc of 6000 I’d enter the following:
W_type=WA fps=213 fc=6000 - Enter the name of the file you’d like results saved to when prompted.
- Repeat if you’d like to do other searches, otherwise end the program.
Deleting all input or output files
Due to the very large number of input and output files this generates, there is also a simple program to delete the remaining files.
Option 1: run directly
- Log into Beocat and navigate to your proj folder
- Run the following command to run the script to delete the files directly:
./delete_files.sh - When prompted, enter yes for whichever groups of files you'd like to delete
Option 2: run through the manager application
- Log into Beocat and navigate to your proj folder
- Run the following command to run the manager program:
./manage_jobs.sh - Enter
dwhen prompted by the program - When prompted, enter yes for whichever groups of files you'd like to delete
FAQs
My jobs keep failing with a TIMEOUT error. What do I do?
You need to lengthen the time specified in run.sh.
Currently, the job is limited to thirty minutes, as specified by the line:
#SBATCH --time=30:00
If I wanted to extend it to an hour, I would change it to
#SBATCH --time=1:00:00
It is good to try to keep this number as low as you can while still having the code finish in time, as it is easier for Beocat to schedule.
More information can also be found under the --time section here: https://slurm.schedmd.com/sbatch.html