Transferring Data using Globus
Globus is a high-speed data transfer service. It is primarily used to transfer data between research institutions, but can also be used to transfer data between Beocat and a laptop or desktop. We suggest using Globus over other file transfer options if you are transferring large data sets. Globus also allows you to share data with those who do not have Beocat accounts.
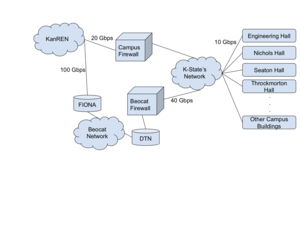
Beocat has two Globus servers - one on the main campus network, and one directly connected to KanREN (essentially for our purposes, the university's Internet Service Provider). To understand which one you should be using an overview of how Beocat connects to the Internet is useful:
As you can see, if you are ON campus, it's faster to use the "DTN" endpoint, but if you are OFF campus, it is faster to use the "FIONA" endpoint. That being said, due to software differences, those two endpoints behave differently, and either CAN be used either on- or off-campus.
Using either endpoint
- Go to https://www.globus.org and click the "Log In" button in the upper-right corner.
- Under "Use your existing organizational login", find "Kansas State University" and click "Continue"
- You will be redirected to a K-State page where you can login with your eID credentials
- You will then be logged into the Globus File Manager.
- Click on "Endpoints"
- In the top box, search for "Beocat" (this is case insensitive)
- This is where the two endpoints diverge in how they work, and where we pick up from below.
Using the on-campus DTN endpoint
- Click on "Kansas State University Beocat". You will see a screen that gives some information about the Endpoint (which you will most likely ignore).
- On the right side of the screen, click on "Open in File Manager"
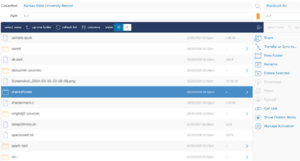
- You will now see your files (your home directory) in Beocat in the left window. From here, you can perform some basic operations, such as renaming or deleting a file, but you cannot upload or download files. (NOTE: If you click the 3-lined icon in the middle of the page as circled in red in the following image, the descriptions of the icons will pop-out): File:GlobusToolExpansion.pngGlobus Tool Expansion
- On the right side of the screen, click where it says "Transfer or sync to".
- Here you can select another research institution to which you have access, or you can click the link to "Install Globus Connect Personal", which will install software on your own computer.
- Once you install Globus Connect Personal, you can use that as your other Endpoint.
- You will now see your files (your home directory) in Beocat in the left window. From here, you can perform some basic operations, such as renaming or deleting a file, but you cannot upload or download files. (NOTE: If you click the 3-lined icon in the middle of the page as circled in red in the following image, the descriptions of the icons will pop-out):
- Now you have two systems to view. Beocat and another. You may drag-and-drop files or folders from one location to another, or use the other features to synchronize files between the two. Once initiated, file transfers via Globus are done in the background. You can close your browser window, or log out of your computer - as long as both endpoints are connected, file transfers will continue. (Note, obviously if you're running Globus Connect Personal on your laptop and you shut it off to take it with you, it is no longer connected. However, as long as the transfer hasn't timed out (24 hours?) it should resume the transfer when you turn it back on.
- You can change directories on either side by clicking on them, or typing the name of the directory (/bulk/username tends to be one frequently used on Beocat).
Sharing data from the on-campus DTN endpoint
Now that you have logged into Beocat using Globus (above), you can share files or folders.
In my example here, I have a folder called "sharedfolder" in my home directory, which I want to make available to others.
- Scroll down so you can see the "sharedfolder" directory, and click on it.
- Click the 'Share' button
- Click on 'Add a Shared Endpoint'
- Give any optional info that may make it easier for those with whom you are sharing to find. In my case, I entered 'Beocat Shared Folder Demo for my Display name and 'Shared Folder for Demonstration Purposes' for the description.
- Click 'Create Share'
- By default, only you have access to this share. Click the "Add Permissions - Share With" button to share with anybody you like.
- A user is typically designated by their email address.
- A group is a group of users you have defined. There is a link on the left side of the web app to create groups.
- All users means anybody who logs in with Globus. Note that if you use this option, anybody will be able to search for and use this collection
- The people you share with have the permission you give: read and/or write. I strongly suggest you do not give "all users" write access to your folder. In fact, be very careful of anybody to whom you give write permission. Remember, you are responsible for the content on your account.
- Complete the process by clicking 'Add Permission'
- Anybody who has permissions to your folder can now, once they login to Globus, search for the collection you just shared. The 'Sharing' tab for your collection (which is where you are after clicking 'Add Permission') has a "View link for Sharing", which you can send to any collaborators so they can more easily find the data which you have shared.

